


Heat pumps are a popular choice due to their energy efficiency, versatility, and ability to provide both heating and cooling. While heat pumps are highly efficient, their performance depends mainly on how well you manage and control the system. In this blog, we'll explain the best ways to prevent a heat pump, maximizing both comfort and energy savings.
If you ever need assistance, remember that Presidential Ventilation Systems Ltd., a proud Daikin Comfort Pro dealer, is always here to help with our heat pump services. We also offer financing options through Financeit, making installing and maintaining a heat pump for your home or business more accessible than ever.
Before diving into the controls, it's essential to understand how a heat pump operates. Heat pumps transfer heat from one location to another, using refrigerant to absorb heat from the air (or the ground in the case of geothermal heat pumps) and move it to your desired location. In summer, the process is reversed, and the heat pump acts like an AC, removing heat from your home and transferring it outside.
Because of their ability to both heat and cool, heat pumps provide an all-in-one solution for year-round comfort. And with today's advanced technology, controlling these systems has become more accessible and more efficient than ever before.
The control of a heat pump involves more than just turning it on and off. Modern heat pumps have various features and settings that allow you to customize your comfort levels while ensuring efficient energy use. Here are some of the primary methods to control your heat pump:
The most common way to control a heat pump is through a thermostat. Whether it's a simple programmable thermostat or a more advanced smart thermostat, the thermostat is your central command center for regulating the temperature in your home or business.
How to Optimize Thermostat Settings for a Heat Pump:
At Presidential Ventilation Systems Ltd., we recommend installing a smart thermostat as part of your heat pump system to give you greater flexibility and control. Our expert professionals can walk you through the setup and show you how to maximize its features.
A zoning system allows you to divide your home or building into separate areas (or "zones"), each with its thermostat. This enables you to control the temperature in each zone independently, ensuring that every room is comfortable without wasting energy heating or cooling unused areas.
Zoning System in Heat Pump Control:
If you're interested in a zoning system, we can install and configure it to work seamlessly with your Daikin heat pump. With flexible financing options through Financeit, upgrading your home's comfort has never been more affordable.
During the colder months, outdoor heat pump units can accumulate frost, especially in cold climates. Most modern heat pumps come equipped with an automatic defrost mode. This feature temporarily switches the system from heating to cooling to melt away any ice buildup on the outdoor unit.
How to Manage Defrost Mode:
Regular maintenance is essential to ensure the defrost mode functions correctly. Our team provides comprehensive heat pump maintenance services to keep your system running smoothly year-round. Contact us today to book your maintenance check.
Most heat pumps come with an emergency heat mode called auxiliary heat. This mode is used when the outdoor temperature is too cold for the heat pump to extract enough heat efficiently, typically in extremely cold climates. The system then relies on an auxiliary heat source, such as electric resistance coils or a furnace, to provide warmth.
When to Use Emergency Heat Mode:
If you're unsure how to use emergency heat mode, we are always here to assist. As a trusted provider of HVAC services, we can help you understand your system's settings and ensure your heat pump is ready for even the coldest days.
In addition to using thermostats, zoning systems, and defrost and emergency modes, here are a few more tips for effectively controlling your heat pump:
Controlling a heat pump may seem complex, but with the right tools and knowledge, it's easy to maintain the perfect indoor climate while maximizing energy savings. Whether you're using a smart thermostat, managing zones, or relying on the automatic defrost function, keeping your heat pump running smoothly comes down to understanding its features and scheduling regular maintenance.
At Presidential Ventilation Systems Ltd., we're dedicated to helping you get the most out of your heat pump. As a proud member of the Better Business Bureau with an A+ rating, we offer the expertise and customer service you can trust. Whether you need help setting up your heat pump or require ongoing heat pump maintenance, we've got you covered. Call us today to learn more about our heat pump services.

When you are looking up home maintenance tips and troubleshooting strategies, you might notice one recurring issue that seems impossible to fix: condensation dripping down your windows while the indoor air feels heavy and stale. Balancing heat retention with adequate moisture control and indoor air quality during the freezing winter months is a massive challenge in modern construction. You want to keep the bitter cold outside where it belongs, but in doing so, you inadvertently trap everyday humidity inside your living space.
The core decision you face as a homeowner is understanding when your property requires a mechanical ventilation intervention to prevent winter moisture buildup without overloading your primary heating equipment. Upgrading your building envelope with heavy insulation and double-pane windows is fantastic for lowering your monthly energy consumption, but it fundamentally changes how your house breathes.
If you are exploring ways to improve your indoor comfort and energy efficiency, upgrading to ductless heat pumps is an excellent starting point. However, heating your home is only half of the equation. To truly resolve window condensation and stale air, you have to look at the entire structural ecosystem. The conflict between retaining expensive heat and exhausting unwanted moisture requires a strategic approach, blending advanced thermal conditioning with dedicated airflow management.
To understand why your windows are crying in January, you have to look at the basic physics of your home. Condensation occurs when warm, moisture-laden indoor air comes into contact with a cold surface, like window glass or an exterior wall. The air rapidly cools, loses its ability to hold water vapor, and deposits that water as liquid droplets.
Everyday activities constantly pump water vapor into your living space. Cooking dinner, taking hot showers, running the dishwasher, and even basic human breathing add gallons of unseen water to your indoor air every single week. In a tightly sealed home, that moisture has absolutely nowhere to go. It builds up until it reaches a saturation point, manifesting as foggy windows, damp walls, and eventually, structural mold.
Older homes rarely had severe winter condensation problems, but not because they were designed better. They were simply drafty. Heat escaped through cracks around doors, poorly sealed windows, and uninsulated attics, taking the indoor humidity out with it. Modern upgrades eliminate those drafts, which saves energy but removes the natural escape route for humid air.
• Older, Drafty Homes — Heat Retention: Poor (High heat loss) — Natural Ventilation: High (Constant drafts) — Winter Condensation Risk: Low (Moisture escapes easily)
• Modern, Airtight Homes — Heat Retention: Excellent (Low heat loss) — Natural Ventilation: Very Low (Sealed envelope) — Winter Condensation Risk: High (Moisture is trapped inside)
This creates a paradox: the more energy-efficient you make your home, the worse your indoor air quality can become if you ignore ventilation. You are essentially living inside a sealed plastic bag. The goal is not to go back to drafty, uncomfortable rooms, but rather to find a way to manage the air exchange deliberately rather than accidentally.
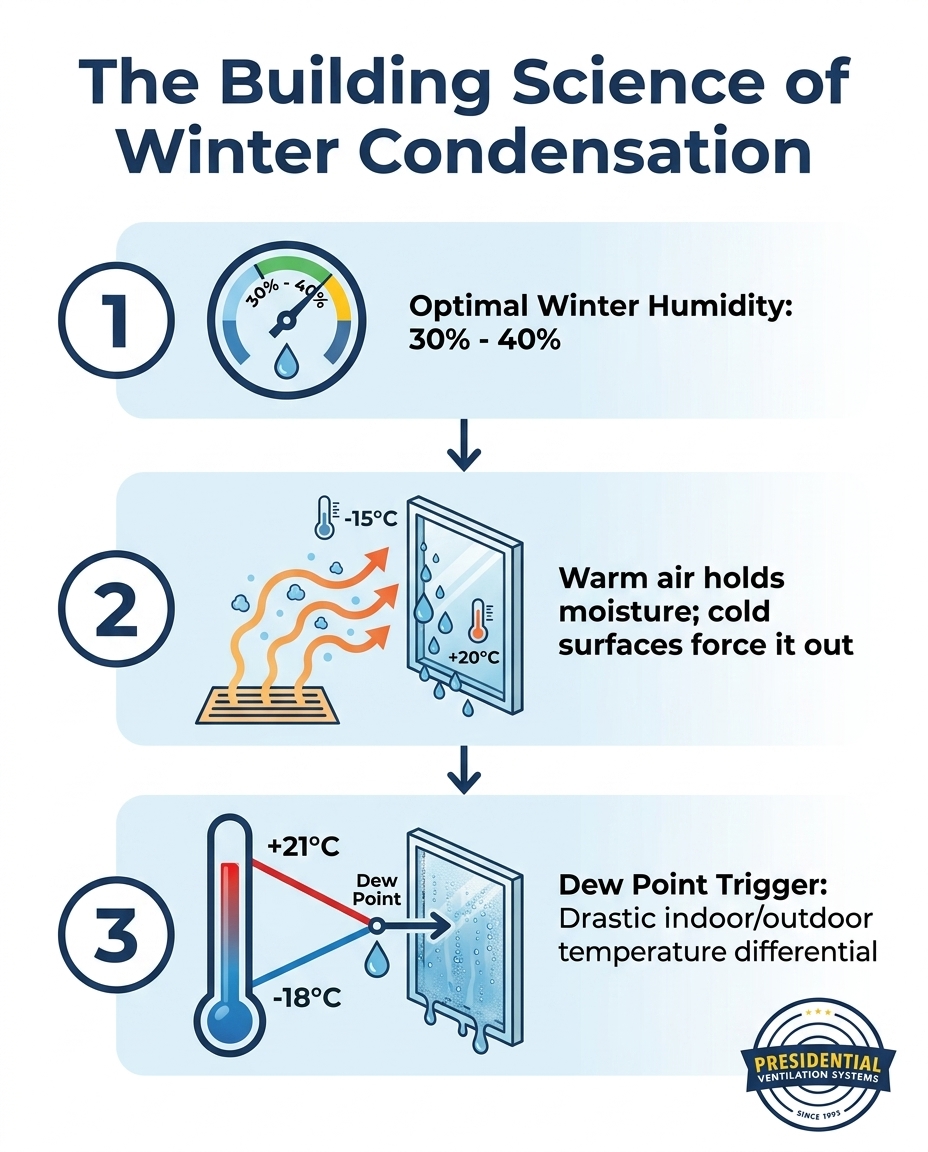
You cannot manage what you do not measure. The most effective way to monitor your indoor relative humidity levels is by using a digital hygrometer. These inexpensive devices give you a real-time readout of the moisture in your air. During the peak cold season, you generally want to aim for an indoor relative humidity between 30% and 40%. If your hygrometer consistently reads above 50% during freezing weather, your home is at a high risk for condensation, mold growth, and structural rot. Tracking these numbers takes the guesswork out of your indoor climate control.
One of the most common misconceptions in modern HVAC is the belief that heat pumps ventilate the home. Because the outdoor unit sits outside and connects to the indoor head, many homeowners assume the system is pulling fresh, crisp air from the yard and blowing it into the living room. This is a myth. Ductless systems do not bring in fresh air.
A heat pump strictly recirculates and conditions the existing indoor air. The connection between the outdoor compressor and the indoor unit consists only of copper refrigerant lines and electrical wires. There is no air duct passing through your wall. The system absorbs heat energy from the outside air, transfers that heat into the refrigerant, pumps the hot refrigerant inside, and blows your existing indoor air over the warm coils to heat your room.
This means if your indoor air is stale, humid, or full of cooking odors, a heat pump will simply heat that stale air and blow it right back at you. If you are researching the best ductless heat pumps guide to solve a stuffy house, you will quickly learn that thermal conditioning (heating and cooling) is completely separate from mechanical ventilation. Relying solely on a heat pump to fix poor air quality is like expecting a space heater to clean your floors—it is simply the wrong tool for the job.
If your home is sealed tight and your heat pump only recirculates existing air, how do you get fresh air inside without opening a window and freezing? The answer is a Heat Recovery Ventilator (HRV). An HRV is a dedicated mechanical ventilation system that actively exchanges stale indoor air for fresh outdoor air, making it a structural necessity for modern airtight homes rather than just a luxury add-on.
Here is how the process works: The HRV pulls warm, humid, stale air from inside your home (typically from bathrooms and kitchens) and pushes it outside. Simultaneously, it pulls cold, fresh air from the outside and brings it indoors. Before the two airstreams exit and enter, they pass through a heat exchange core. The warm outgoing air transfers its heat energy to the cold incoming air without the two airstreams ever physically mixing.
• Energy Retention: You get fresh outdoor air that has been pre-warmed by the heat you were about to throw away.
• Moisture Control: The system actively exhausts the heavy, humid air that causes window condensation.
• Continuous Exchange: It provides a constant, measured flow of fresh air regardless of how tightly sealed your home is.
By constantly managing the air exchange during the freezing winter months, an HRV prevents mold growth and structural rot. It dilutes indoor pollutants, volatile organic compounds (VOCs) from furniture, and lingering odors that build up in sealed environments. For homeowners utilizing ducted heat pump systems, HRV units can often be integrated directly into the existing ductwork, providing seamless, whole-home ventilation that works in perfect harmony with your primary heating source.

When a tightly sealed home feels overly humid or the heating seems unbalanced, the instinct is often to assume the primary heating equipment has failed. However, persistent issues frequently stem from a misdiagnosis of the equipment's role rather than a total system breakdown.
A typical pattern we see is homeowners struggling with poor airflow and assuming their heat pump is broken. One homeowner reached out last fall when their mini splits were not working properly. A previous company had misdiagnosed the equipment and failed to resolve the issue, leaving the home uncomfortable. A specialized technician was able to diagnose the actual airflow and refrigerant problem within minutes, arranged a warranty repair, and permanently resolved the system failure, proving that accurate diagnosis is everything.
If you are experiencing high indoor relative humidity levels or poor heating performance, there are a few baseline checks you can perform:
• Check your HRV controls: Ensure the system is actually turned on and set correctly for winter operation. Many HRVs require higher continuous ventilation rates during extreme cold to handle the stark temperature differentials.
• Verify heat pump fan speeds: Ensure your indoor heads are set to appropriate fan speeds. If the fan is set too low, the unit cannot properly mix the conditioned air throughout the room, leading to cold spots and stagnant air.
• Clear obstructions: Make sure furniture, curtains, or rugs are not blocking the airflow path of your indoor units.
While checking settings is safe and encouraged, complex airflow imbalances, electrical faults, or refrigerant issues require a licensed professional. Attempting DIY fixes on high-voltage equipment or sealed refrigerant lines is dangerous and will void your manufacturer warranties. When basic setting adjustments do not solve the problem, calling a qualified technician ensures the root cause is addressed safely.
To protect your investment and ensure both your heating and ventilation systems operate efficiently, ongoing maintenance is non-negotiable. Neglecting routine upkeep forces your equipment to work harder, driving up your energy bills and shortening the lifespan of the system.
The most critical maintenance task you can perform is cleaning the indoor air filters on your heat pump. These washable mesh screens trap dust, pet hair, and airborne debris before they can coat the sensitive evaporator coils.
1. Turn off the power: Always turn off the unit using the remote control before opening the front panel.
2. Remove the filters: Gently lift the front cover and slide the mesh filters out of their tracks.
3. Wash and dry: Rinse the filters under lukewarm water. If they are heavily soiled, use a mild dish soap. Crucially, let them air dry completely before reinstalling them. Putting wet filters back into the unit invites mold growth.
4. Repeat frequently: During the freezing winter months when the system runs constantly, you should clean these filters every two to four weeks.
Clogged filters drastically reduce heating capacity. The system simply cannot push warm air through a wall of dust, causing the equipment to overwork and eventually shut down on a high-pressure fault.
The outdoor compressor requires just as much attention as the indoor head. Maintaining proper clearance around the unit is vital. After heavy snowfalls, carefully brush snow away from the top and sides of the unit. Never use a hard shovel, as you can easily bend the delicate aluminum fins that facilitate heat transfer. Ensure there is at least 18 to 24 inches of clear space around the entire unit so it can pull in the massive volumes of air it needs to operate.
Nova Scotia's coastal salt air and high ambient humidity present unique challenges for outdoor equipment. The maritime environment can accelerate corrosion and cause rapid frost accumulation on the coils. Working with local experts who understand how to properly place and protect systems against maritime weather ensures your equipment withstands these harsh conditions. Regular visual inspections are necessary to check for salt buildup or excessive ice.
It is also important to understand the normal defrost cycle. When it is cold and humid outside, frost naturally forms on the outdoor coils. The heat pump will temporarily reverse its cycle, stopping the indoor fan and sending hot refrigerant outside to melt the ice. You may see steam rising from the outdoor unit—this is completely normal. However, if the unit becomes encased in a solid block of ice that does not melt, turn it off immediately and schedule routine heat pump maintenance to prevent severe compressor damage.
Condensation forms when warm, moist indoor air hits cold window glass and cools rapidly, turning water vapor into liquid droplets. In modern, tightly sealed homes, everyday activities like cooking and showering generate moisture that cannot escape through natural drafts. If your indoor relative humidity levels are too high during freezing weather, this trapped moisture will consistently pool on your windows, signaling a need for better mechanical ventilation.
No, ductless heat pumps do not bring in fresh outside air. They strictly recirculate and heat or cool the existing air inside your room. The connection between the outdoor and indoor units consists only of refrigerant lines and wiring, not air ducts. To introduce fresh air into a tightly sealed home, you need a separate mechanical ventilation system, such as a Heat Recovery Ventilator (HRV).
A heat pump alone cannot actively reduce winter humidity, as it does not exhaust air to the outside. To control humidity, you must pair your heating system with proper mechanical ventilation. Operating an HRV allows you to exhaust the heavy, damp indoor air and replace it with drier outside air, effectively lowering your indoor relative humidity levels while your heat pump maintains the room's temperature.
Winter air feels stale because modern homes are built with tight envelopes that prevent natural air leakage. When windows and doors stay closed for months at a time, odors, carbon dioxide, and volatile organic compounds (VOCs) become trapped inside. Without a dedicated ventilation strategy to physically remove this stale air and pull in fresh outdoor air, the indoor environment quickly degrades, regardless of how warm the house is.
Yes, an HRV system is designed to run simultaneously with your heat pump. In fact, they are perfect partners. The HRV handles the critical task of exchanging stale, moist air for fresh outdoor air, while the heat pump focuses entirely on maintaining your desired temperature. Running them together ensures your home remains both comfortably warm and filled with healthy, breathable air throughout the winter.
A comfortable, healthy home requires a deliberate balance between efficient thermal heating and dedicated moisture control. While airtight construction is fantastic for keeping your utility bills low, it demands a proactive approach to indoor air quality. Condensation, stale air, and trapped odors are not permanent flaws in your home; they are simply solvable structural challenges that require the right mechanical integration.
By understanding that heating and ventilation are separate but deeply complementary functions, you can stop fighting your home's natural physics. A clear, technically accurate explanation of how mechanical ventilation solves moisture and air quality issues without compromising the home's heating efficiency is the key to long-term comfort. If you are ready to integrate your systems seamlessly and eliminate winter condensation for good, exploring professional solutions like Lennox ductless systems paired with proper ventilation will transform how your home feels all season long.
If you are starting your January and February mornings with a towel in hand to wipe down soaking wet window sills, you are dealing with one of the most common homeowner questions answered by our ventilation professionals every winter. At Presidential Ventilation Systems Ltd., we hear from frustrated residents who turn up the heat, feel warm, yet watch heavy droplets of water—or worse, a thick layer of frost—continue to build up on the inside of their glass. This is a damaging cycle that ruins wood trim, promotes mold growth, and leaves you wondering if your windows are failing.
The truth our team frequently shares is that window condensation is rarely a problem with the windows themselves. It is a fundamental conflict between how modern homes are built and how we live inside them. Tightly sealed homes are excellent at trapping heat, but they are equally effective at trapping moisture. As a homeowner, you have to decide if this excess humidity can be managed with simple daily habits or if it requires a dedicated mechanical solution. Whether you rely on baseboards, a furnace, or ductless heat pumps, treating your home's heating and breathing as a single integrated system is the only way to protect your indoor air quality during deep winter cold snaps.
To stop water from pooling on your sills, you first need to understand why it forms. The physics of condensation come down to temperature and the air's capacity to hold water. Warm air acts like a sponge; it naturally holds a significant amount of invisible water vapor. Cold air, on the other hand, is dense and cannot hold much moisture at all. When the warm, humid air inside your living room drifts over to a freezing cold window pane, that air cools rapidly. Because it can no longer hold all its moisture, it drops the excess water directly onto the glass.
The symptom of a larger issue: Wiping down the glass removes the water, but it does not remove the humidity from your home. When our technicians measure indoor environments across Mount Uniacke, we frequently see homes sitting at a staggering 55% to 60% relative humidity while outdoor temperatures hover around -10°C. Condensation is simply a visual indicator of this overarching indoor air quality imbalance. If water is collecting on your windows, that same moisture is likely seeping into your attic, your wall cavities, and your insulation.
The exact moment when air releases its moisture is called the dew point. The dew point is driven by the temperature differential between the inside and outside of your home. If your house is 21°C inside, but the glass surface is cooled to 2°C by the outdoor weather, any air touching that glass will instantly reach its dew point. To prevent this physical reaction, you have to monitor your optimal indoor relative humidity percentages carefully.
• Above 4°C — Recommended Maximum Indoor Humidity: 40% - 50% — Risk of Condensation: Low risk on double-pane windows
• -6°C to 4°C — Recommended Maximum Indoor Humidity: 35% - 40% — Risk of Condensation: Moderate risk, especially overnight
• -12°C to -6°C — Recommended Maximum Indoor Humidity: 30% - 35% — Risk of Condensation: High risk without active ventilation
• Below -12°C — Recommended Maximum Indoor Humidity: 25% - 30% — Risk of Condensation: Severe risk during deep cold snaps
Building standards have changed dramatically over the last few decades. Modern properties—and older homes that have been retrofitted between 2010 and 2023 with new R-20+ wall insulation and siding—are built tightly to conserve energy. We often explain to our clients that draft sealing is incredibly effective for keeping your heating bills low, but it completely eliminates the natural ventilation that older, draftier homes relied on to stay dry.
In the past, a drafty house naturally cycled dry outdoor air through the living space, pushing humid indoor air out through the cracks. Today, that moisture has nowhere to go. Every daily activity adds a surprising amount of water vapor to your sealed indoor environment.
• Cooking and boiling water: Releasing steam directly into the kitchen air.
• Hot showers and baths: Pumping dense water vapor into hallways and bedrooms.
• Drying clothes indoors: Hanging damp laundry adds massive amounts of moisture as it dries.
• Simply breathing: A family of four releases several liters of water vapor into the air every single day just by exhaling.
This trapped moisture becomes a serious problem in the Mount Uniacke and surrounding Nova Scotia region. We experience freezing, damp maritime winters. Unlike dry inland climates where the winter air is completely devoid of moisture, our coastal environment maintains high ambient outdoor humidity even during freezing temperatures. This damp cold makes mechanical moisture management absolutely necessary, as the natural drying effect of winter air is much lower here.
A frequent misunderstanding our installation crew hears is that installing a heat pump will automatically fix a home's stuffy air. Many homeowners assume that because a heat pump has an outdoor unit and an indoor unit, it must be pulling fresh outdoor air inside. This is a myth. Whether you are running a standard model or a high-efficiency cold-climate unit rated for -25°C, ductless systems are highly efficient heating and cooling machines, but they are not ventilators.
The reality of refrigerant cycles: A ductless system transfers heat energy, not air volume. The outdoor compressor extracts heat from the outside air and moves that heat through copper refrigerant lines into your home. The indoor head unit on your wall simply draws in the existing, stale room air, passes it over a warm coil to heat it, and blows that exact same air back into the room.
Because they do not introduce a single drop of fresh outside air, heat pumps do not inherently solve indoor humidity buildup in the winter. They condition the temperature perfectly, but the moisture remains trapped inside the room. If you are researching the specific operational mechanics of these units, checking out a guide to the best ductless heat pumps will show you exactly how they maximize heating efficiency without acting as an exhaust system. To maintain optimal indoor relative humidity percentages, you need a separate strategy for moving air in and out of the building.
When you spot condensation forming during the first major November frost, your first step should be evaluating your daily habits. Sometimes, minor lifestyle adjustments are enough to keep the humidity in check during mild winter weather. Our team recommends taking immediate, manual control over the moisture you generate.
• Run exhaust fans longer: Leave your standard 50 CFM or 80 CFM bathroom fan running for at least 30 minutes after a shower.
• Use your range hood: Always run the kitchen exhaust fan when boiling water or cooking on the stovetop.
• Open interior doors: Keep bedroom and closet doors open to allow air to circulate freely throughout the house, preventing cold pockets where moisture settles.
• Track your numbers: Purchase a basic digital hygrometer to monitor your optimal indoor relative humidity percentages daily.
Spot-ventilation, like a bathroom fan, only addresses localized moisture. It pulls steam out of one specific room, but it does not create a balanced exchange of air for the whole house. During extreme temperature drops, these manual methods usually hit their limit. The tipping point occurs when you are running your exhaust fans constantly, keeping doors open, and wiping windows down, yet the ice still forms. At this stage, lifestyle changes have failed. To protect your home's structural integrity from rot and your family's lungs from mold spores, a dedicated mechanical solution becomes necessary.
When tightly sealed homes need a permanent solution for trapped moisture, our ventilation experts point to Heat Recovery Ventilators (HRVs) and Energy Recovery Ventilators (ERVs). These systems act as the lungs of your home. They provide a continuous, controlled exchange of stale, moist indoor air for fresh, dry outdoor air, often utilizing a high-performance 75% or greater sensible recovery efficiency core.
How the heat exchange core works:
1. The system pulls warm, humid, stale air from high-moisture areas like kitchens and bathrooms.
2. Simultaneously, it draws in freezing, fresh air from outside.
3. Both airstreams pass through a central heat exchange core, but they never actually mix.
4. The heat from the outgoing stale air is transferred to the incoming cold air.
5. The home receives a constant supply of fresh air that is already pre-warmed, preserving your heating efficiency while dumping the excess humidity outside.
Treating heating and breathing as an integrated whole-home system is the ultimate fix for winter condensation. If your home uses localized mini-splits, pairing them with a centralized HRV ensures every room stays fresh and dry. For homeowners looking at larger renovations, ducted heat pump systems can often be integrated directly with advanced ventilation units, creating a seamless climate control network that handles both temperature and humidity automatically during deep winter cold snaps.
Proper sizing and integration of ventilation equipment require building science expertise, not guesswork. Every home breathes differently depending on its age, insulation levels, and layout. If your windows are sweating constantly, having your current heating and ventilation setup evaluated by a neutral expert will give you a clear path forward. A professional assessment provides a detailed explanation of your system's pros, cons, and overall efficiency, ensuring you do not install a ventilator that is too large or too small for your square footage.
One local Mount Uniacke homeowner reached out to our team last fall because their heat pump required an inspection and deep clean. During the professional and thorough service, our technician tested everything and provided valuable product information about how their specific system interacts with the home's overall airflow. This kind of comprehensive evaluation helps identify whether your condensation is caused by a failing exhaust fan, an unbalanced HRV, or simply a lack of mechanical ventilation entirely.
Because of our unique maritime weather, you need a system designed for this environment. Presidential Ventilation Systems Ltd. brings deep local expertise in designing and installing integrated HVAC systems specifically built to withstand and perform efficiently in Nova Scotia's demanding coastal climate. Furthermore, if you decide to upgrade your equipment, a professional evaluation is usually required. Generic energy rebates and tax incentive programs often require certified professional installation to qualify, making expert professional heating services a smart starting point.
Condensation forms when warm, moist indoor air comes into contact with cold window glass. The warm air rapidly cools and reaches its dew point, forcing it to release water vapor as liquid droplets. This is a common symptom in tightly sealed homes that lack proper ventilation to exhaust daily humidity.
No, a standard ductless heat pump does not bring in fresh outside air. It works by transferring heat energy from the outdoors into your home through refrigerant lines. The indoor unit simply recirculates and heats the existing air inside the room, which is why a separate ventilation system is often needed.
In our experience, the optimal indoor relative humidity during the winter months should generally be kept between 30% and 40%. Maintaining this range ensures the air is comfortable to breathe while remaining dry enough to prevent heavy condensation and ice buildup on cold window panes.
Ice forms on the inside of your windows when the outdoor temperature drops so low that the interior surface of the glass falls below the freezing mark. When the high indoor humidity touches this freezing glass, the resulting condensation freezes instantly into frost or solid ice.
In a modern, tightly sealed home, pairing an HRV with a heat pump is highly recommended. While the heat pump efficiently warms the home, the HRV continuously exhausts stale, humid air and brings in fresh air, preventing the moisture buildup that leads to window condensation and poor air quality.
Maritime winters feature high ambient outdoor humidity even during freezing temperatures, unlike dry inland climates. This damp, heavy cold means homes naturally dry out much slower, making mechanical moisture management and active ventilation critical to maintaining healthy indoor air quality.
Managing winter moisture is ultimately about balancing temperature, draft sealing, and active ventilation. Understanding this building science framework empowers you to make informed decisions about your home's health. You do not have to spend every winter morning wiping down window sills and worrying about water damage. By addressing the root cause of the humidity, you can protect your property and breathe easier. If you are ready to complete your whole-home comfort strategy, our team is here to help you explore professional heat pump installation and ventilation options to keep your air fresh, warm, and perfectly balanced all season long.